3.4 常用输入框
输入信息是软件和人交换的必要手段,通过界面可以极大改进用户的输入体验。本节讨论常用输入框的使用。
3.4.1 列表输入框
最简单的是列表输入框,在2.3.5节我们已经见过Task的配置输入参数采用的列表输入的方式。列表可以通过vscode.window.showQuickPick()函数实现,其签名如下:
interface QuickPickOptions {
    title?: string;
    placeHolder?: string;
    onDidSelectItem?(item: QuickPickItem | string): any;
    // 其他省略
}

function showQuickPick(
    items: readonly string[],
    options?: QuickPickOptions
): Thenable<string>;
第一个参数是列表选项,第二个参数是QuickPickOptions类型表示输入框的各种配置。配置中比较常用的有title标题、placeHolder输入提示和onDidSelectItem切换选择时的回调函数等。
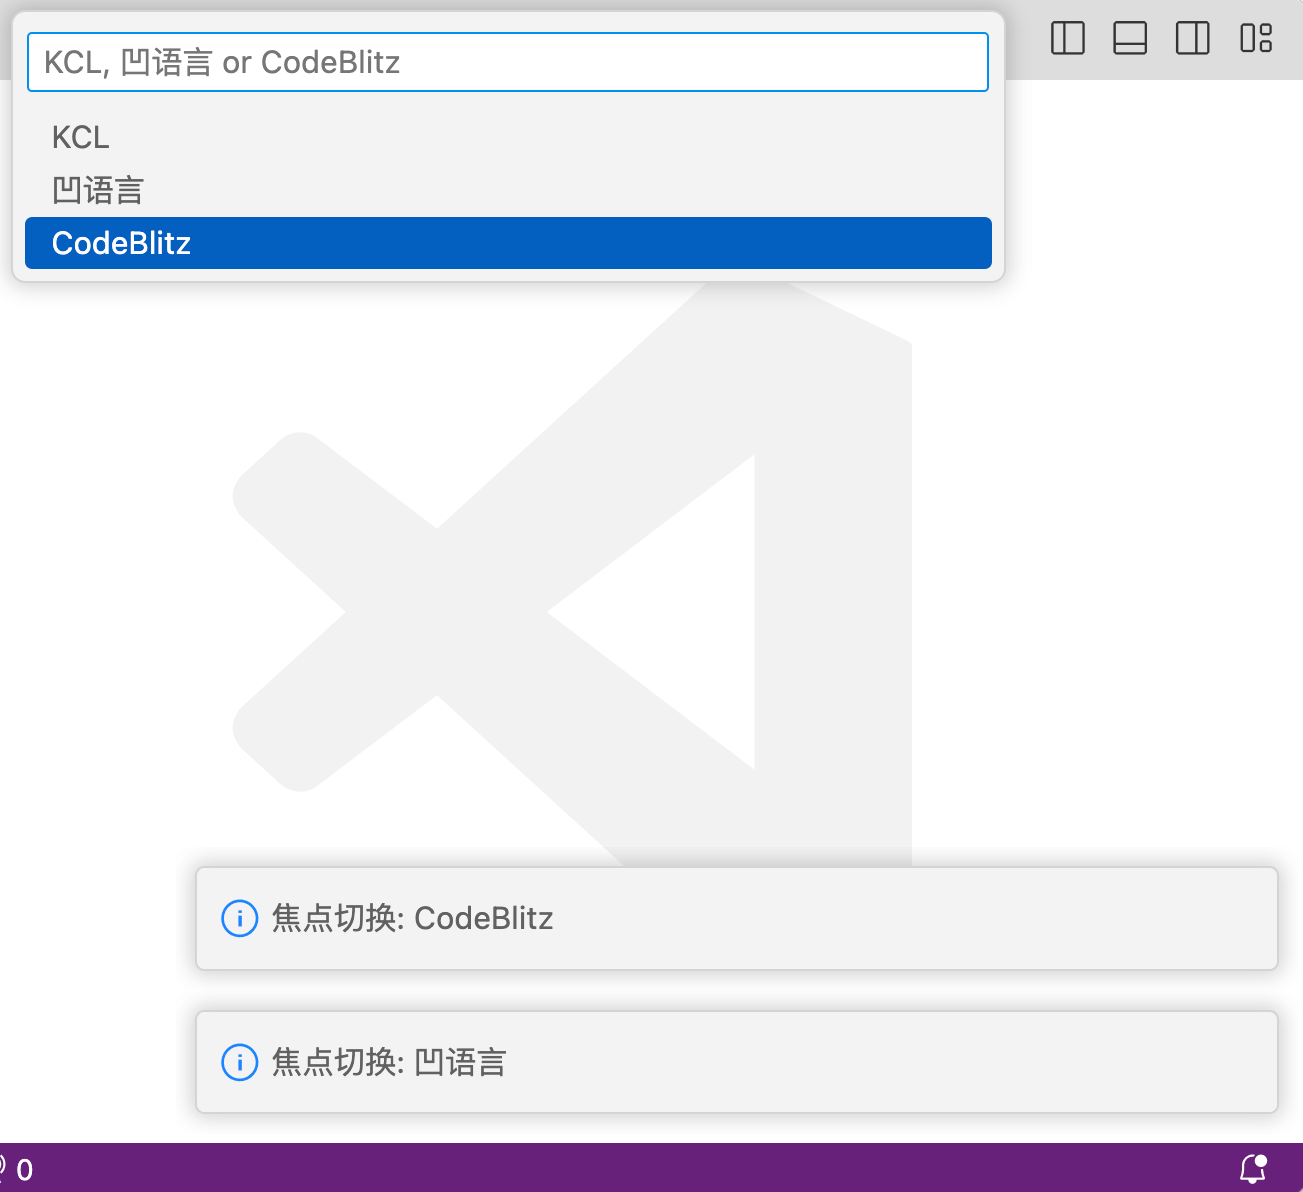
下面是一个例子:
function activate(context) {
    context.subscriptions.push(
        vscode.commands.registerCommand('extdev.showQuickPick', () => {
            vscode.window.showQuickPick(
                ['KCL', '凹语言', 'CodeBlitz'],
                {
                    placeHolder: 'KCL, 凹语言 or CodeBlitz',
                    onDidSelectItem: item =>
                        vscode.window.showInformationMessage(
                            `焦点切换: ${item}`
                        )
                }
            ).then((result) => {
                vscode.window.showInformationMessage(`选中: ${result}`);
            });
        })
    );
}
显示效果如下:

3.4.2 通用输入框
列表适合有固定选择的输入项。如果是更普通的输入,可以用vscode.window.showInputBox()函数,其函数签名如下:
interface InputBoxOptions {
    title?: string;
    value?: string;
    placeHolder?: string;
    password?: boolean;
    validateInput?(value: string): string;
    // 其他省略
}

function showInputBox(options?: InputBoxOptions): Thenable<string>;
因为没有后续列表项,参数主要是InputBoxOptions配置信息,其标题、默认值和提示信息等基础内容和QuickPickOptions相似。但是输入框不仅仅可以设置密码输入模式,还可以通过validateInput函数验证输入的合法性。
下面是一个例子:
function activate(context) {
    context.subscriptions.push(
        vscode.commands.registerCommand('extdev.showInputBox', () => {
            vscode.window.showInputBox({
                value: 'abc',
                placeHolder: 'For example: abc. But not: 123',
                validateInput: text => {
                    vscode.window.showInformationMessage(`Validating: ${text}`);
                    return text === '123' ? 'Not 123!' : null;
                }
            }).then((result) => {
                vscode.window.showInformationMessage(`Got: ${result}`);
            });
        })
    );
}
显示效果如下:

遇到无效的输入:

3.4.3 认识 QuickInput 对象
showQuickPick和showInputBox都属于包装的用户更友好的API,但是缺乏一定的灵活性。他们底层都是通过createQuickPick个createInputBox两个函数实现,返回的是QuickPick和InputBox对象,这两个对象的基类都是QuickInput对象。QuickInput对象的定义如下:
interface QuickInput {
    title: string | undefined;      // An optional title.
    step: number | undefined;       // An optional current step count.
    totalSteps: number | undefined; // An optional total step count.

    // If the UI should allow for user input. Defaults to true.
    enabled: boolean;
    // If the UI should show a progress indicator. Defaults to false.
    busy: boolean;
    // If the UI should stay open even when loosing UI focus. Defaults to false.
    ignoreFocusOut: boolean;

    show(): void;
    hide(): void;
    onDidHide: Event<void>;
    dispose(): void;
}
属性部分主要有title标题信息和step、totalSteps表示的第几步骤等信息。方法部分主要是显示和隐藏控制、隐藏时的回调函数和释放资源。
下面是派生出来的QuickPick和InputBox对象:
interface QuickPick<T extends QuickPickItem> extends QuickInput {
    // Current value of the filter text.
    value: string;

    // Optional placeholder shown in the filter textbox when no filter
    // has been entered.
    placeholder: string | undefined;

    // Items to pick from. This can be read and updated by the extension.
    items: readonly T[];

    // An event signaling when the selected items have changed.
    readonly onDidChangeSelection: Event<readonly T[]>;

    // 更多信息暂省略
}

interface InputBox extends QuickInput {
    // Current input value.
    value: string;

    // Optional placeholder shown when no value has been input.
    placeholder: string | undefined;

    // If the input value should be hidden. Defaults to false.
    password: boolean;

    // An event signaling when the value has changed.
    readonly onDidChangeValue: Event<string>;
    // An event signaling when the user indicated acceptance of the input value.
    readonly onDidAccept: Event<void>;

    // 更多信息暂省略
}
QuickInput无法直接创建,只能创建派生的QuickPick和InputBox对象:
function createQuickPick<T extends QuickPickItem>(): QuickPick<T>;
function createInputBox(): InputBox;
我们以QuickPick为例展示如何用底层API创建,首先是封装一个myShowQuickPick函数:
/**
 * @param {string[]} items
 * @returns vscode.Thenable<string|undefined>
 */
function myShowQuickPick(items) {
    const quickPick = vscode.window.createQuickPick();
    quickPick.items = items.map(label => ({label}));
    quickPick.show();

    return Promise.race([
        new Promise(c => quickPick.onDidChangeSelection((selection) => {
            if (selection[0]) {
                c(selection[0].label);
            } else {
                c(undefined);
            }
            quickPick.hide();
        })),
        new Promise(c => quickPick.onDidAccept(() => {
            c(quickPick.value);
            quickPick.hide();
        })),
        new Promise(c => quickPick.onDidHide(() => {
            c(undefined);
        }))
    ]);
}
其中比较关键的地方是返回一个Promise对象,其中包含了onDidChangeSelection表示点列表项输入、onDidAccept表示点键盘输入和窗口隐藏任何一种输入形式的结果。
下面是通过命令使用myShowQuickPick例子的效果:
/** @param {vscode.ExtensionContext} context */
function activate(context) {
    context.subscriptions.push(
        vscode.commands.registerCommand('extdev.createQuickPick', () => {
            myShowQuickPick(
                ['KCL', '凹语言', 'CodeBlitz']
            ).then(result => {
                vscode.window.showInformationMessage(`result: ${result}`);
            });
        })
    );
}
这样就可以跟着特定的需要封装功能,同时达到类似vscode.window.showQuickPick()易用性。
3.4.4 QuickPick 输入框定制
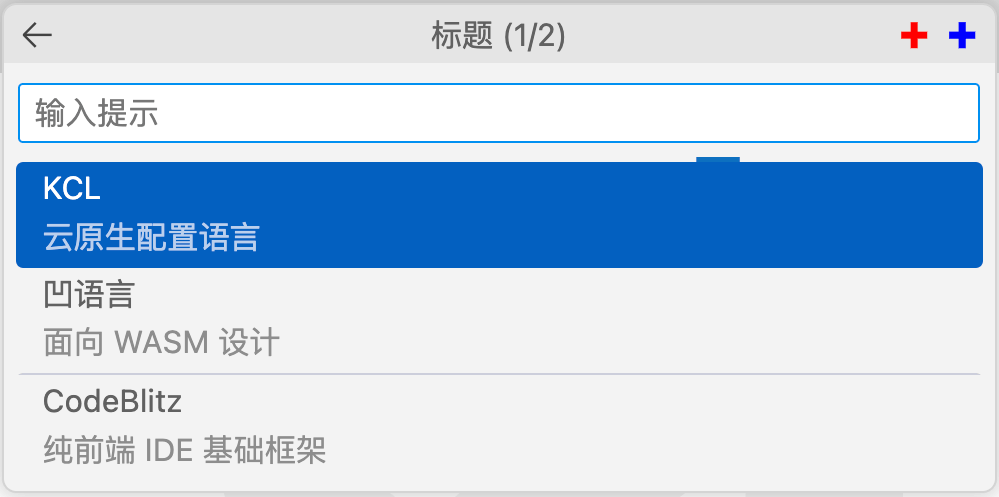
QuickPick 输入框内置了很多功能,下面是一个效果图:

首先首先通过scode.window.createQuickPick()函数创建并显示:
function activate(context) {
    const quickPick = vscode.window.createQuickPick();
    quickPick.show();

    ...
}
然后设置标题、总步骤数、输入提示和忙碌状态:
    quickPick.title = "标题";
    quickPick.step = 1; // 从 1 开始
    quickPick.totalSteps = 2;

    // 输入的值为空时显示
    quickPick.placeholder = "输入提示";

    // 会出现一个处理或加载的动画, 其他不影响
    quickPick.busy = true;
定制左边是会退按钮,右边是自定义按钮:
    /** @type {vscode.QuickInputButton} */
    const btnRedAdd = {
        "iconPath":vscode.Uri.file(context.asAbsolutePath('icon-add-red.svg')),
        "tooltip": "红色图标"
    };

    /** @type {vscode.QuickInputButton} */
    const btnBlueAdd = {
        "iconPath": vscode.Uri.file(context.asAbsolutePath('icon-add-blue.svg')),
        "tooltip": "蓝色图标"
    };

    quickPick.buttons = [
        vscode.QuickInputButtons.Back,
        btnRedAdd, btnBlueAdd
    ];
然后是下拉列表项,包含分组分割线:
    // 下拉列表, 依然可以手工输入
    quickPick.items = [
        {'label': 'KCL', 'detail':'云原生配置语言'},
        {'label': '凹语言', 'detail':'面向 WASM 设计'},
        {kind: vscode.QuickPickItemKind.Separator}, // 分隔符
        {'label': 'CodeBlitz', 'detail':'纯前端 IDE 基础框架'}
    ];
然后是设置必要的消息处理函数后,就可以运行了。
3.4.5 小结
本节讨论的QuickInput输入框是定制性比较强的输入UI组件,可以容易实现多步骤输入等深度定制的特性,用户可以根据自己需要同时借鉴社区场景的代码方式再自行探索。